EVERYTHING YOU NEED TO KNOW ABOUT TILE LAYING
If you’re beginning work on a new tiling project, and it’s your first time working with tile, you may be a bit confused. There is a lot to know about laying and placing tile. From mixing up mortar, to cutting tiles and grouting the final result – it can get confusing.
Here are the most important factors you need to know about tile laying
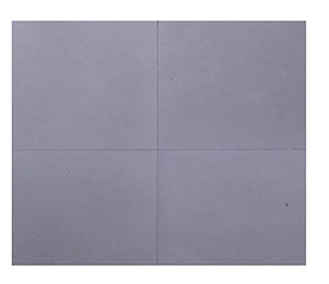
Basically there are two types of tile laying 1) Paper joint
2) Spacer joint
1. Paper Joint:
Placing tiles without any gap in between is called as Paper joint.
Advantages:
- Sourcing of tile masons for paper joint is easy, because most of the tile masons have experience in this system from many decades.
- Additional tools like tile spacers are not required
- Tile grouting activity is simple and consumption of tile grout is less; hence this system is economically better than spacer joints.
Disadvantages:
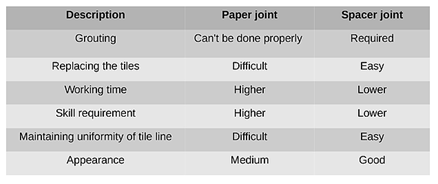
- Since the minor dimensional variation is possible in tiles, paper joints often leads to unequal gaps between the tiles. These gaps are not suitable for proper grouting. So this leads to dust collection.
- Replacing the damaged tile is difficult, due to nearest tiles also can get damaged during the rectification works.
- It is very difficult to maintain line & level in the tile joints due to manufacturing variations.
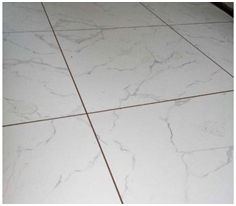
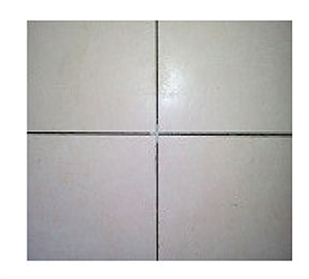
2. Spacer Joint:
Placing tiles using spacers for maintaining equal tile joint is called as spacer joint.
Advantages:
- Since the minor dimensional variation is possible in tiles, spacer joint helps in camouflage those variations.
- Spacer joints will be filled with the suitable grout.
- Replacing damaged tile is easy, because we can remove the particular tile without damaging the nearest tiles.
- Spacer joint is used for the purpose of uniformity in tile joints and for better finish; Aesthetic appearance also improves.
Disadvantages:
- Currently there are some shortage in trained/experienced tile masons who can work with Spacer joint
- This system requires additional tools like Spacers & additional material – grouts when comparing with Paper joint.
- Grouting is an additional activity here and mastering this activity is highly important; this involves one or two days of extra work.
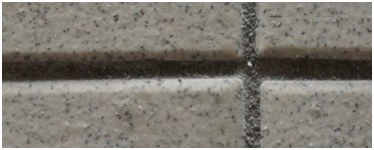
Paper joint vs Spacer joint
TILE SPACERS
In Spacer Joint, the tile spacers are used to create a gap that is filled by grout, which would finally give a symmetrical finish to the surface. Tile spacers are plastic objects either made in T or crossed shapes that are placed between the tiles to maintain a constant and consistent spacing between the tiles.
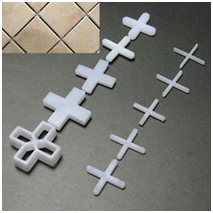
- Tile spacers are available in the market from width sizes ranging from 2mm to 6mm.
- Lightweight and sturdy plastic is the primary material for tile spacer production.
- The selection of tile spacers depends on the personal preference and the standards.
- Proper tile spacing with the help of tile spacers allows free movement of tile to consider the stress relief.
- In general, the spacers used for walls takes a minimum value of 2mm, and the floor spacers make a size of 3mm.
How to use Tile Spacers?
At first, place the tiles on the prepared surface with a layer of adhesive. Now place the spacers at each corner of the tile. Place the tile spacers directly on the tile corners and push the tile together until the spacer entirely holds to each edge of the tile. This process helps to ensure an equal gap between each tile.
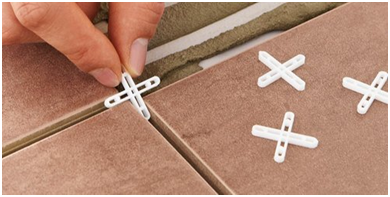
The number of tile spacers used is equal to the number of tiles multiplied by four. It is recommended to buy a little extra to account for any damage or loss of spacers during the laying process.
Another critical point to remember while using tile spacers is their removal. Remove the tile spacers before they get stuck with the underlying mortar or the adhesive. Tile spacers should be removed 20 to 30 minutes after the adhesive sets with the tile.
Benefits of Using Tile Spacers
The essential benefits of using tile spacers are:
- Tile spacers enable the floor to have straight and even grout spacings.
- Enables to measure the tile while laying out, labeling them, and while cutting them.
- The floor gets a professional and beautiful finish
- The use of tile spacers protects the integrity of the tile floors.
HOW TO CHOOSE THE RIGHT TILE GROUT
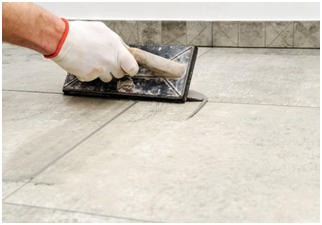
Once you install the tile spacers next is you should fill the grout in between the tiles. Grout is an essential part of your tile installation and choosing the right grout can make all the difference between an installation that looks and performs beautifully over time.
There are several different types of grout on the market today and we’d like to tell you about three common ones used for tile and stone installations. We’ll also discuss grout colors.
What is grout and why do you need it?
Grout is used as filler for the joints between tiles, once the tile has been set for installation. Most grouts are a powdered mix of cement, lime, color pigment and sometimes sand that hardens when mixed with water and left to cure.
Grout offers a number of valuable benefits:
- It gives your floor or wall a crisp finished appearance.
- It helps keep dirt and debris from getting in between and under your tile.
- It adds rigidity and strength to the tile installation.
It is important that you select the right grout for your application. Start by measuring the space between the tiles.
- If the space is larger than 1/8 of an inch, use a sanded grout. Unsanded grout will shrink as it cures and not fill the joint properly.
- If the width is 1/8 of an inch or smaller, use unsanded, acrylic latex or epoxy grout so you can completely fill those joints with grout material.
Three Different Types of Grout
Here are three types of grout to choose from
- Sanded Grout
Sanded grout is for large grout joints – anything 1/8” of an inch or greater. The sand mixed in the grout helps to hold the grout in the joints. Sanded grout should be mixed to a consistency comparable to that of peanut butter; it will have a sand-like texture after its cured. It is important to note that any excess grout left on your tile should be removed before it’s allowed to cure.
Sanded Portland based cement grout is the most common type of grout used and it is recommended for grout joints larger than 1/8” of an inch. It is available in dry or pre-mixed forms and should only be applied after your floor has had ample time to cure.
This type of grout may be used inside or outside, on floors, walls and ceilings. It needs to be sealed to protect it from dirt, spills, and discoloration from wear and UV lighting.
Note: Never use sanded grout with marble tiles. The sand will scratch the marble.
2. Unsanded Grout
Unsanded grout is used for smaller grout joints that measure 1/8” of an inch or less. Using sanded grout in smaller grout joints will result in too much sand and not enough grout in your grout joints. Un-sanded grout may require a little extra pressure to work it into those smaller joints. It is important to fill the joints completely; otherwise your grout may collapse. Un-sanded grout should also be mixed to a peanut butter like consistency and should not be allowed to cure on the surface of the tile.
Unsanded grout is cement based and very similar to sanded grout except that it lacks sand for strength and filler. Unsanded grout is stickier than the sanded variety and is commonly used on walls, floors, and counter tops for joints 1/8” of an inch or smaller.
Unsanded grout needs to be similarly sealed to protect it from spills, stains, discoloration, and UV lighting.
3. Epoxy Grout

Epoxy grout is very different from the more common cement type that we’ve been talking about. Epoxy grout never needs to be sealed and is not porous. It also prevents the growth of bacteria and is less likely to crack over time.
Epoxy grout is ideal for counter tops, outdoor patios, pool deck and water line pool tile. It is also much more expensive than traditional grout and is subject to a very short ‘open time’ (i.e., the time you have to work with the material before it becomes to hard to use). The open time is manufacturer specific; be sure to find out how much open time your epoxy grout will have before you mix it.
Choosing a Grout Color
Grouts come in different colors. When choosing a grout color, there is basically two schools of thought: monochromatic and dichromatic.
- Monochromatic is a grout color that blends with the tile so the tile stands out and the grout does not become the focal point. Many people choose a monochromatic grout color. A good example of this would be white tile with white grout.
- Dichromatic is a grout color that contrasts with the tile. It can be either lighter or darker and usually makes the tile pattern grid work pop up and catch the eye more than the actual tile pattern. A good example would be white tile with black grout.
Grout color really is a personal choice as well as a design preference. There is no right or wrong answer. Your local flooring or hardware store should have a grout color chart or grout samples available to assist you when choosing your grout color.
Please feel free to contact me if you need any further information. Please let me know if you have any questions.
Mobile/WhatsApp No: +91 9963-277-542
Email: info1@kreativehouse.asia
Address 1: Flat No.302, 1st Floor, Sree Homes, Plot No.51, M.B.Society, Hitech City Main Rd, Hyderabad, Telangana 500084.
Address 2: Regus Pune Metropolitan Business Centre Pvt Ltd, Baner, Pune 411045
Subscribe to Kreativehouse:
YouTube: www.youtube.com/channel/UCLYGdZagVC7I8vSaS4-7iyg
Like us on Facebook: www.facebook.com/kreativehouse.asia
Follow us on Linkedin: www.linkedin.com/company/kreative-house
Follow us on Twitter: www.twitter.com/KreativeHousee
Follow us on Pinterest: www.pinterest.com/Kreative_House
Follow us on Instagram: www.instagram.com/kreative_house_hyd_pune
View Blogspot: www.kreativehousehyderabad.blogspot.com